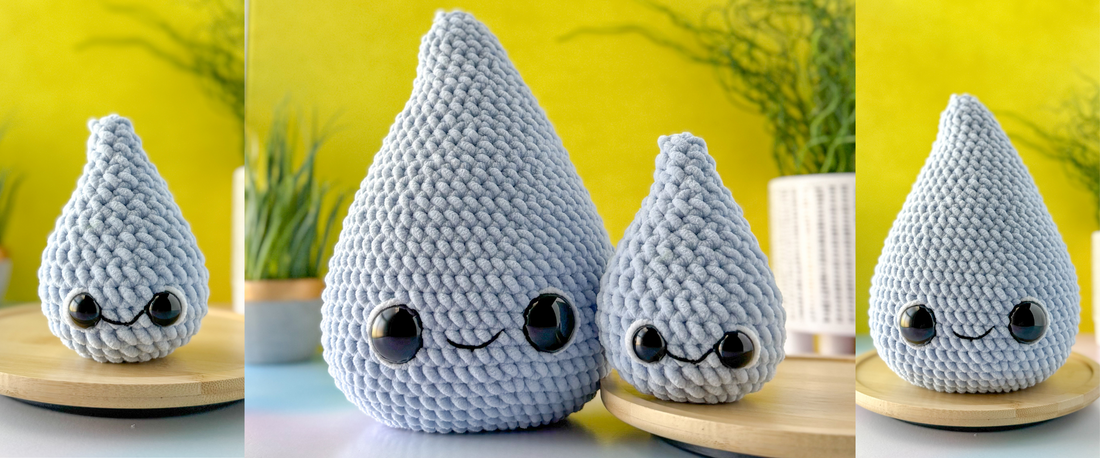
Crochet a Raindrop Plush – Free Amigurumi Pattern (Big + Mini Sizes)
Looking for a free amigurumi pattern that's quick, cute, and just a little unexpected? This Raindrop crochet pattern is beginner-friendly and includes instructions for both a Big plush and a Mini version—perfect for gifts, sensory toys, or rainy-day makes. Plus, if you’re using poly pellets for added weight, I’ve included a simple pouch tutorial to keep everything neat and beginner-proof!
Want to skip the scrolling? Grab the printable PDF version [right here].
Materials & Tools
For Mini Raindrop:
- Yarn: Yarn Art Dolce, Super Bulky (6) [100% Micro Polyester, 131 yds/120 m per 100g skein] Color: Pale Blue 776; (15g/20 yrds), White 741 (12 in/30cm
- (2) 18mm safety eyes
- 40g Poly Pellets
For Big Raindrop:
- Yarn: Yarn Art Dolce, Super Bulky (6) [100% Micro Polyester, 131 yds/120 m per 100g skein] Color: Pale Blue 776; (90g/118 yrds), White 741 (18 in/46cm)
- (2) 30mm safety eyes
- 175g Poly Pellets
For Both:
- US Size H-8 (5mm) hook
- 8 in/20 cm of Worsted (4) weight yarn in Black or Black Embroidery Thread
- Yarn needle
- Stitch marker
- Scissors
- Disposable Foot Sock
- Cup
- Scale for measuring grams
- Fiberfill stuffing
Abbreviations
- sc: single crochet
- inc: increase
- dec: decrease
- st(s): stitch(es)
Finished Sizes:
MIni- 5 inches (13cm) tall
Big- 9 inches (23cm) tall
Pattern Notes:
- The pattern is written in US crochet terminology.
- Pattern is worked in continuous rounds without joining unless otherwise stated.
- Mark the first stitch of the round, moving marker up each round.
- This pattern includes the use of safety eyes. It is not recommended to use safety eyes on projects that will be given to babies or small children, because they pose a choking hazard. Consider omitting the eyes or using a baby/child safe alternative.
These patterns were designed by Anna Cole and tech edited by Sweet Bird Crochet to ensure clarity and accuracy.
Copyright:
This pattern is for personal use only. It is prohibited to copy, translate, distribute, and/or resell any information in this document in any way.
You are free to sell the finished items made from this pattern provided you give credit to the designer Little Baby Rory Crafts (@littlebabyrorycrafts) in any listings or advertising.
How to Add Poly Pellets to Your Mini Raindrop
Poly pellets help add weight and stability to your amigurumi, making it sit nicely. Here’s how to prepare and insert them using a nylon sock:
Step 1: Prepare the Nylon Sock
Place the disposable nylon sock into a cup, folding the edges over the rim to hold it in place.
Step 2: Measure the Poly Pellets
Turn kitchen scale on and set to grams. Place sock lined jar on kitchen scale and zero it out. Pour pellets into sock until scale measures 40g for the mini and 175g for the big version.
Step 3: Secure the Pellets
Remove the folded edges from jar and tie a knot securely above the pellets.
Mini Raindrop:

In Blue
R1: In a Magic Ring, 6sc (6)
R2: [1sc, 3sc in the next 2 sts] 2 times (14)
R3: 2sc, [inc] 4 times, 3sc, [inc] 4 times, 1sc (22)
R4: sc in each st around (22)
R5: 2sc, [1sc, inc] 4 times, 3sc, [1sc, inc] 4 times, 1sc (30)
R6-8: (3 rounds) sc in each st around (30)
To place the safety eyes, first identify R1-3, which form an oval. The longer sides mark the front and back of the raindrop. Flatten the piece in this direction to keep the eyes centered. Then, insert the safety eyes between R6 and R7, four stitches apart, and secure them with the backs

R9: [4sc, dec, 4sc] 3 times (27)
R10: [7sc, dec] 3 times (24)
R11: [3sc, dec, 3sc] 3 times (21)
Begin stuffing. Create a hole in stuffing and insert sock filled with pellets. Continue stuffing.

R12: [5sc, dec] 3 times (18)
R13: [2sc, dec, 2sc] 3 times (15)
R14: sc in each st around (15)
R15: [3sc, dec] 3 times (12)
R16: [1sc, dec, 1sc] 3 times (9)
R17: sc in each st around (9)
Finish Stuffing.
R18: [1sc, dec] 3 times (6)
Fasten off, leaving an 8 inch (20cm) tail. Using tapestry needle and tail, weave tail in the front loop of each remaining stitch, pull tight to close. Hide remaining tail in work.
Using white yarn and tapestry needle, add highlight on the outside of each eye.
Using black yarn and tapestry needle, embroider a mouth centered between eyes.
Optional: If you would like your raindrop to have a small curve at the top, bend
the last few rounds to either the right or left.

Big Raindrop:

In Blue
R1: In a Magic Ring, 6sc (6)
R2: [1sc, 3sc in the next 2 sts] 2 times (14)
R3: 2sc, [inc] 4 times, 3sc, [inc] 4 times, 1sc (22)
R4: 2sc, [1sc, inc] x4, 3sc, [1sc, inc] x4, 1sc (30)
R5: 2sc [2sc, inc] x4, 3sc, [2sc, inc] x4, 1sc (38)
R6: 2sc [3sc, inc] x4, 3sc, [3sc, inc] x4, 1sc (46
R7: sc in each st around (46)
R8: 2sc [4sc, inc] x4, 3sc, [4sc, inc] x4, 1sc (54)
R9: Sc in each st around (54)
R10: 2sc, [7sc, inc] 3 times, 3sc, [7sc, inc] 3 times, 1sc (60)
R11-17: (7 rounds) sc in each st around (60)
To place the safety eyes, first identify R1-6, which form an oval. The longer sides mark the front and back of the raindrop. Flatten the piece in this direction to keep the eyes centered. Then, insert the safety eyes between R13 and R14, 9 stitches apart, and secure them with the backs.

R18: [9sc, dec, 9sc] 3 times (57)
R19: [17sc, dec] 3 times (54)
R20: [8sc, dec, 8sc] 3 times (51)
R21: [15sc, dec] 3 times (48)
R22: [7sc, dec, 7sc] 3 times (45)
Begin stuffing. Create a hole in stuffing and insert sock filled with pellets. Continue stuffing.

R23: [13sc, dec] 3 times (42)
R24: [6sc, dec, 6sc] 3 times (39)
R25: [11sc, dec] 3 times (36)
R26: [5sc, dec, 5sc] 3 times (33)
R27: [9sc, dec] 3 times (30)
R28: sc in each st around (30)
R29: [4sc, dec, 4sc] 3 times (27)
R30: [7sc, dec] 3 times (24)
R31: [3sc, dec, 3sc] 3 times (21)
R32: [5sc, dec] 3 times (18)
R33: sc in each st around (18)
R34: (2sc, dec, 2sc] 3 times (15)
R35: [3sc, dec] 3 times (12)
Finish Stuffing.
R36: [dec] 6 times (6)
Fasten off, leaving an 8 inch (20cm) tail. Using tapestry needle and tail, weave tail in the front loop of each remaining stitch, pull tight to close. Hide remaining tail in work.
Using white yarn and tapestry needle, add highlight on the outside of each eye.
Using black yarn and tapestry needle, embroider a mouth centered between eyes.
Optional: If you would like your raindrop to have a small curve at the top, bend
the last few rounds to either the right or left.

Try other colors!

Want to mix it up? Try red for a blood drop or purple for a little Purple Rain. Tag me on instagram @littlebabyrorycrafts if you make one! I’d love to see your raindrops out in the wild!


